
코딩하는 오징어
Reference Count를 통한 Netty의 ByteBuf memory 관리 본문
Netty는 ByteBuf를 data structure로 이용하고 있으며 ByteBuf는 RefereneCount (ReferenceCounted interface를 상속하고 있다.)를 통해 memory를 release할 지 결정한다. 여기서 memory를 release를 한다는 건 어떤 의미일까? java는 garbage collector가 메모리를 알아서 관리해줄텐데 잘못된 reference count 관리에 의해서 memory leak이 발생한다는 건 어떤 의미일까? 그러기 위해서는 먼저 Java NIO ByteBuffer에서 생성된 buffer가 더 이상 참조되지 않을 때 어떤 방식으로 메모리가 수집 되는 지 살펴보아야한다. ByteBuffer.allocate() 를 이용하여 heap buffer로 생성한다면 (참조 하는 변수를 null로 세팅할 경우) gc가 발생했을 때 알아서 수집되겠지만 ByteBuffer.allocateDirect() 를 통해 kernel buffer를 생성한다면 (non-heap) 해당 buffer는 언제, 어떻게 메모리를 정리하게 되는지 살펴보자.
ByteBuffer.allocateDirect(int)
public static ByteBuffer allocateDirect(int capacity) {
    return new DirectByteBuffer(capacity);
}
java nio의 ByteBuffer.allocateDirect method를 호출하게 되면 DirectByteBuffer 생성자를 통해 kernel buffer를 얻어온다. DirectByteBuffer 생성자는 어떻게 생겼는지 보자.

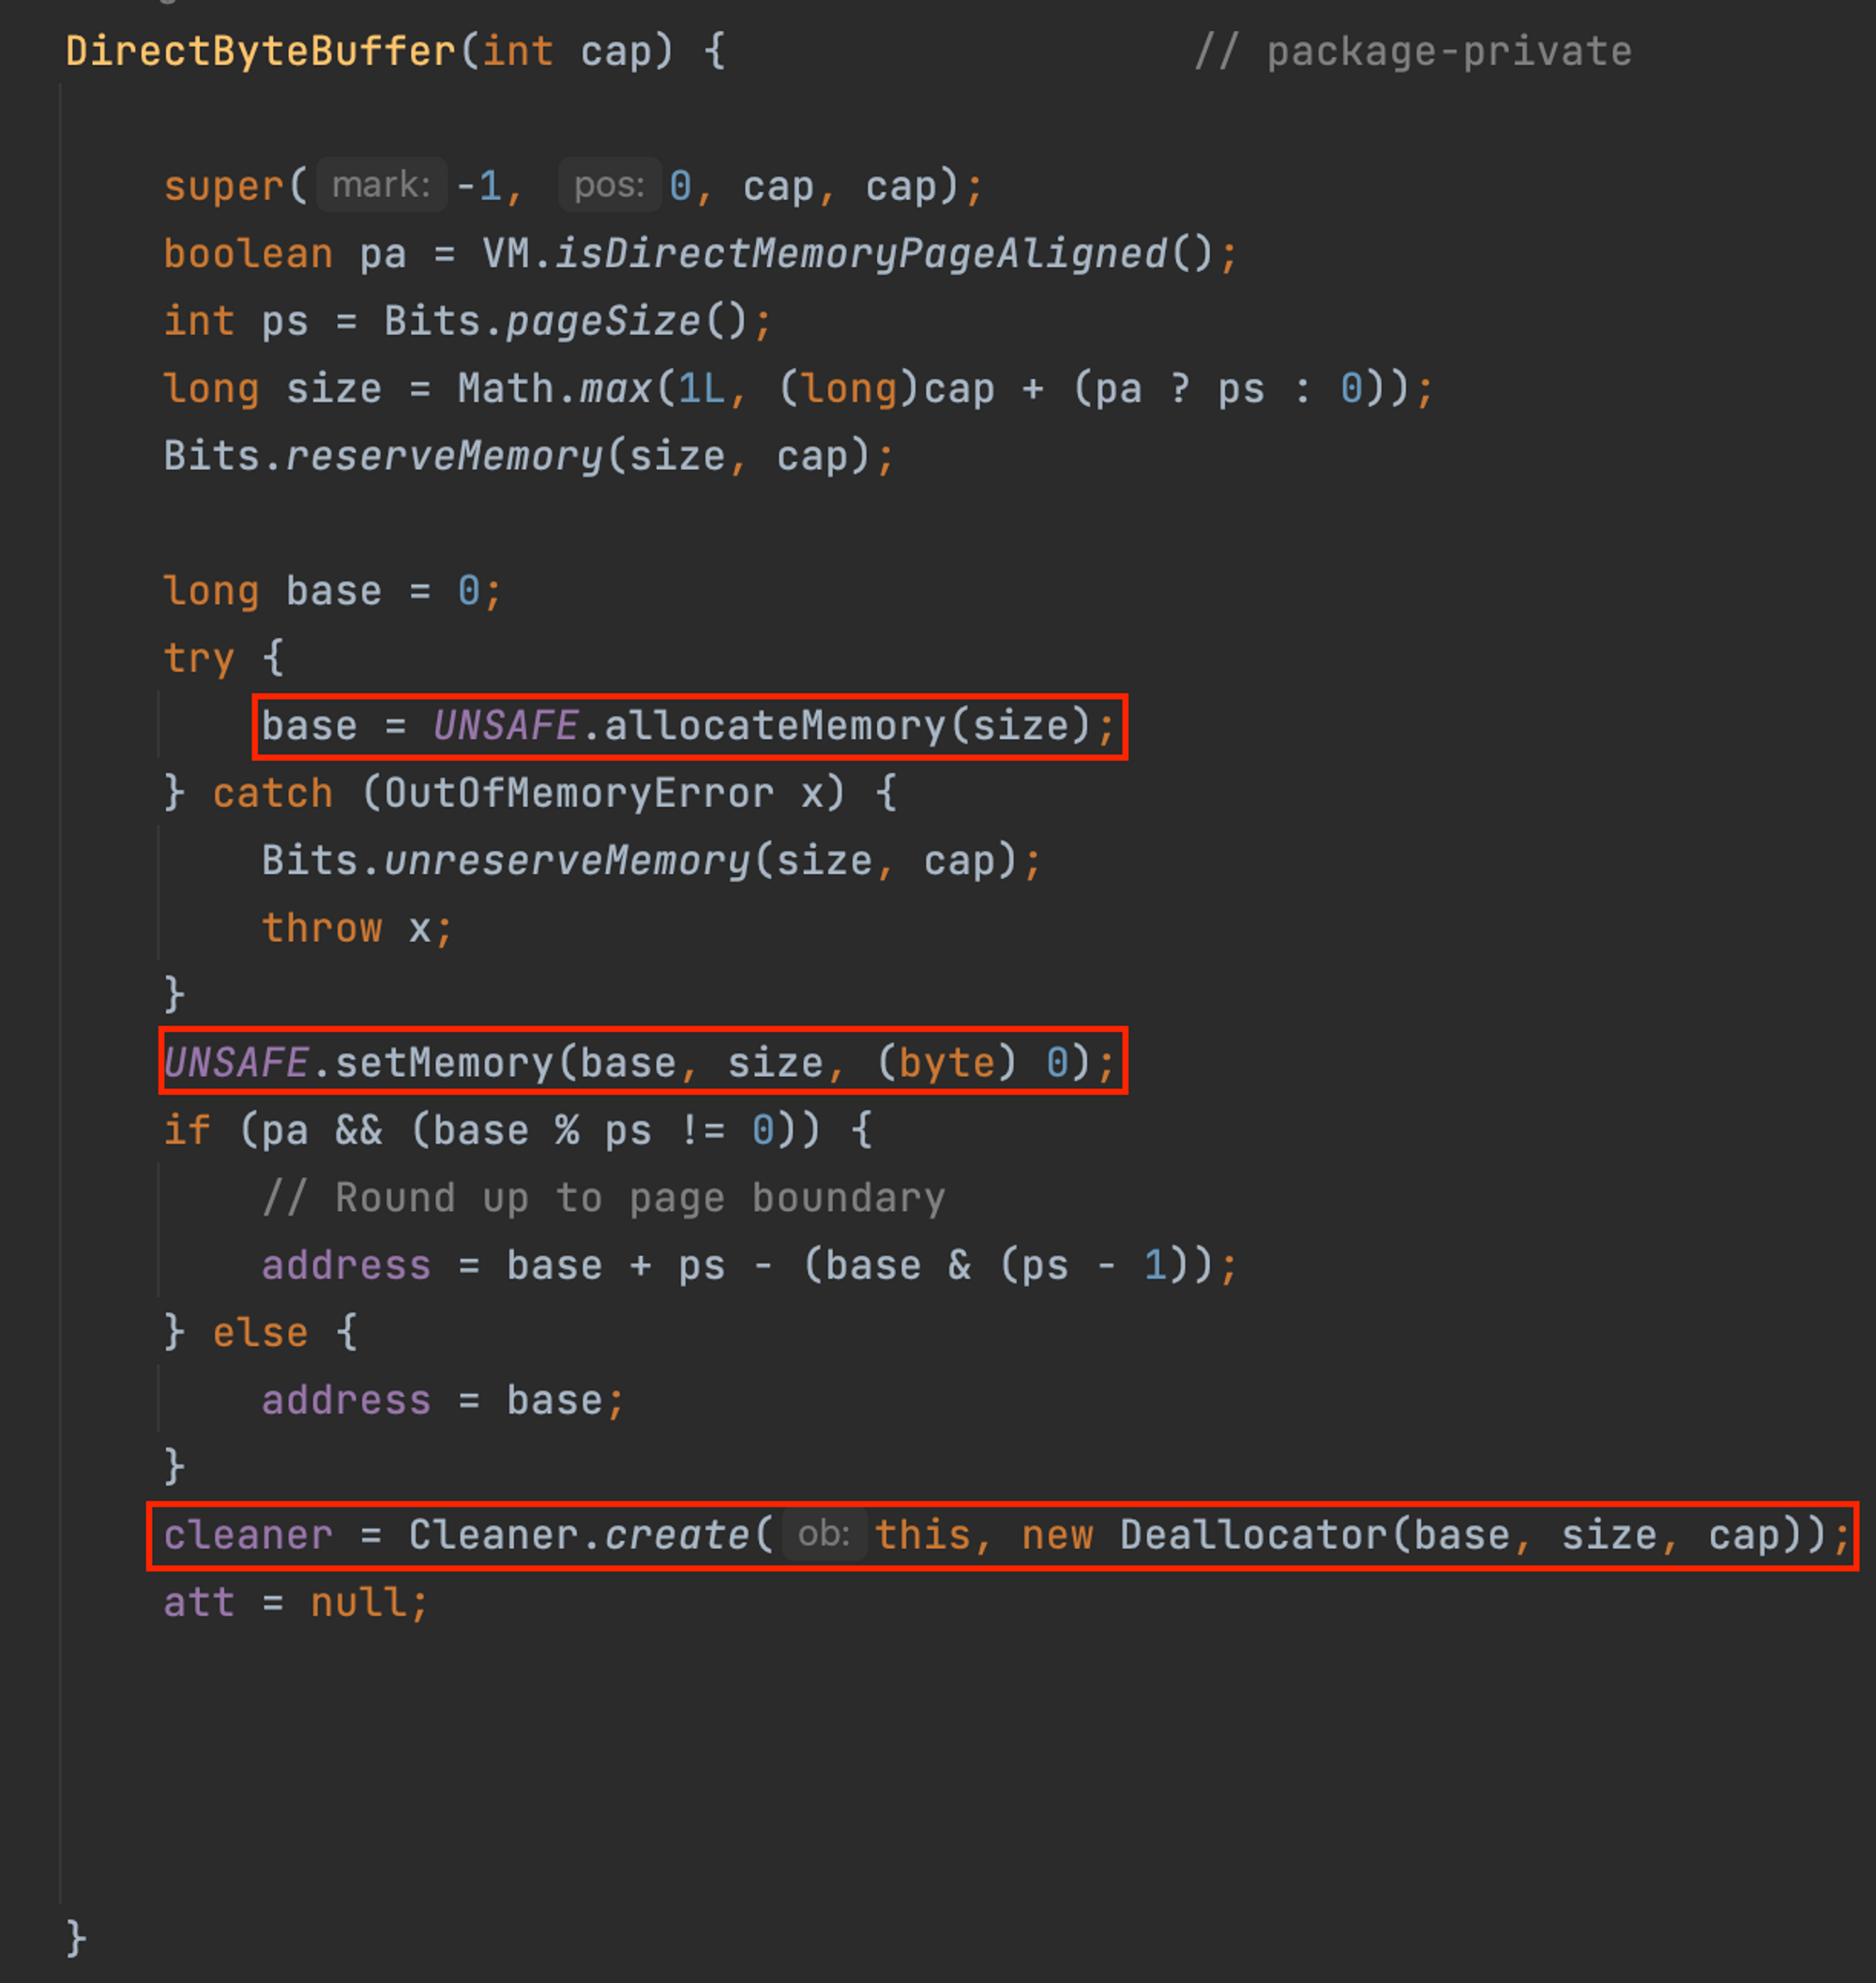
DirectByteBuffer의 생성자는 위와 같이 작성 되어있으며 우리가 주의깊게 봐야할 부분은 세 가지이다.
- UNSAFE
- Deallocator
- Cleaner
UNSAFE (jdk.internal.misc)
해당 객체는 Singleton으로 생성되며 JNI를 통해 memory를 시스템 콜을 호출하며 memory를 할당하거나 해제하는 method를 제공한다. kernel buffer를 생성할 때 해당 객체를 이용하여 memory를 할당하거나 해제한다.
- memory allocate: Unsafe.allocateMemory()
- memory free: Unsafe.freeMemory
Deallocator
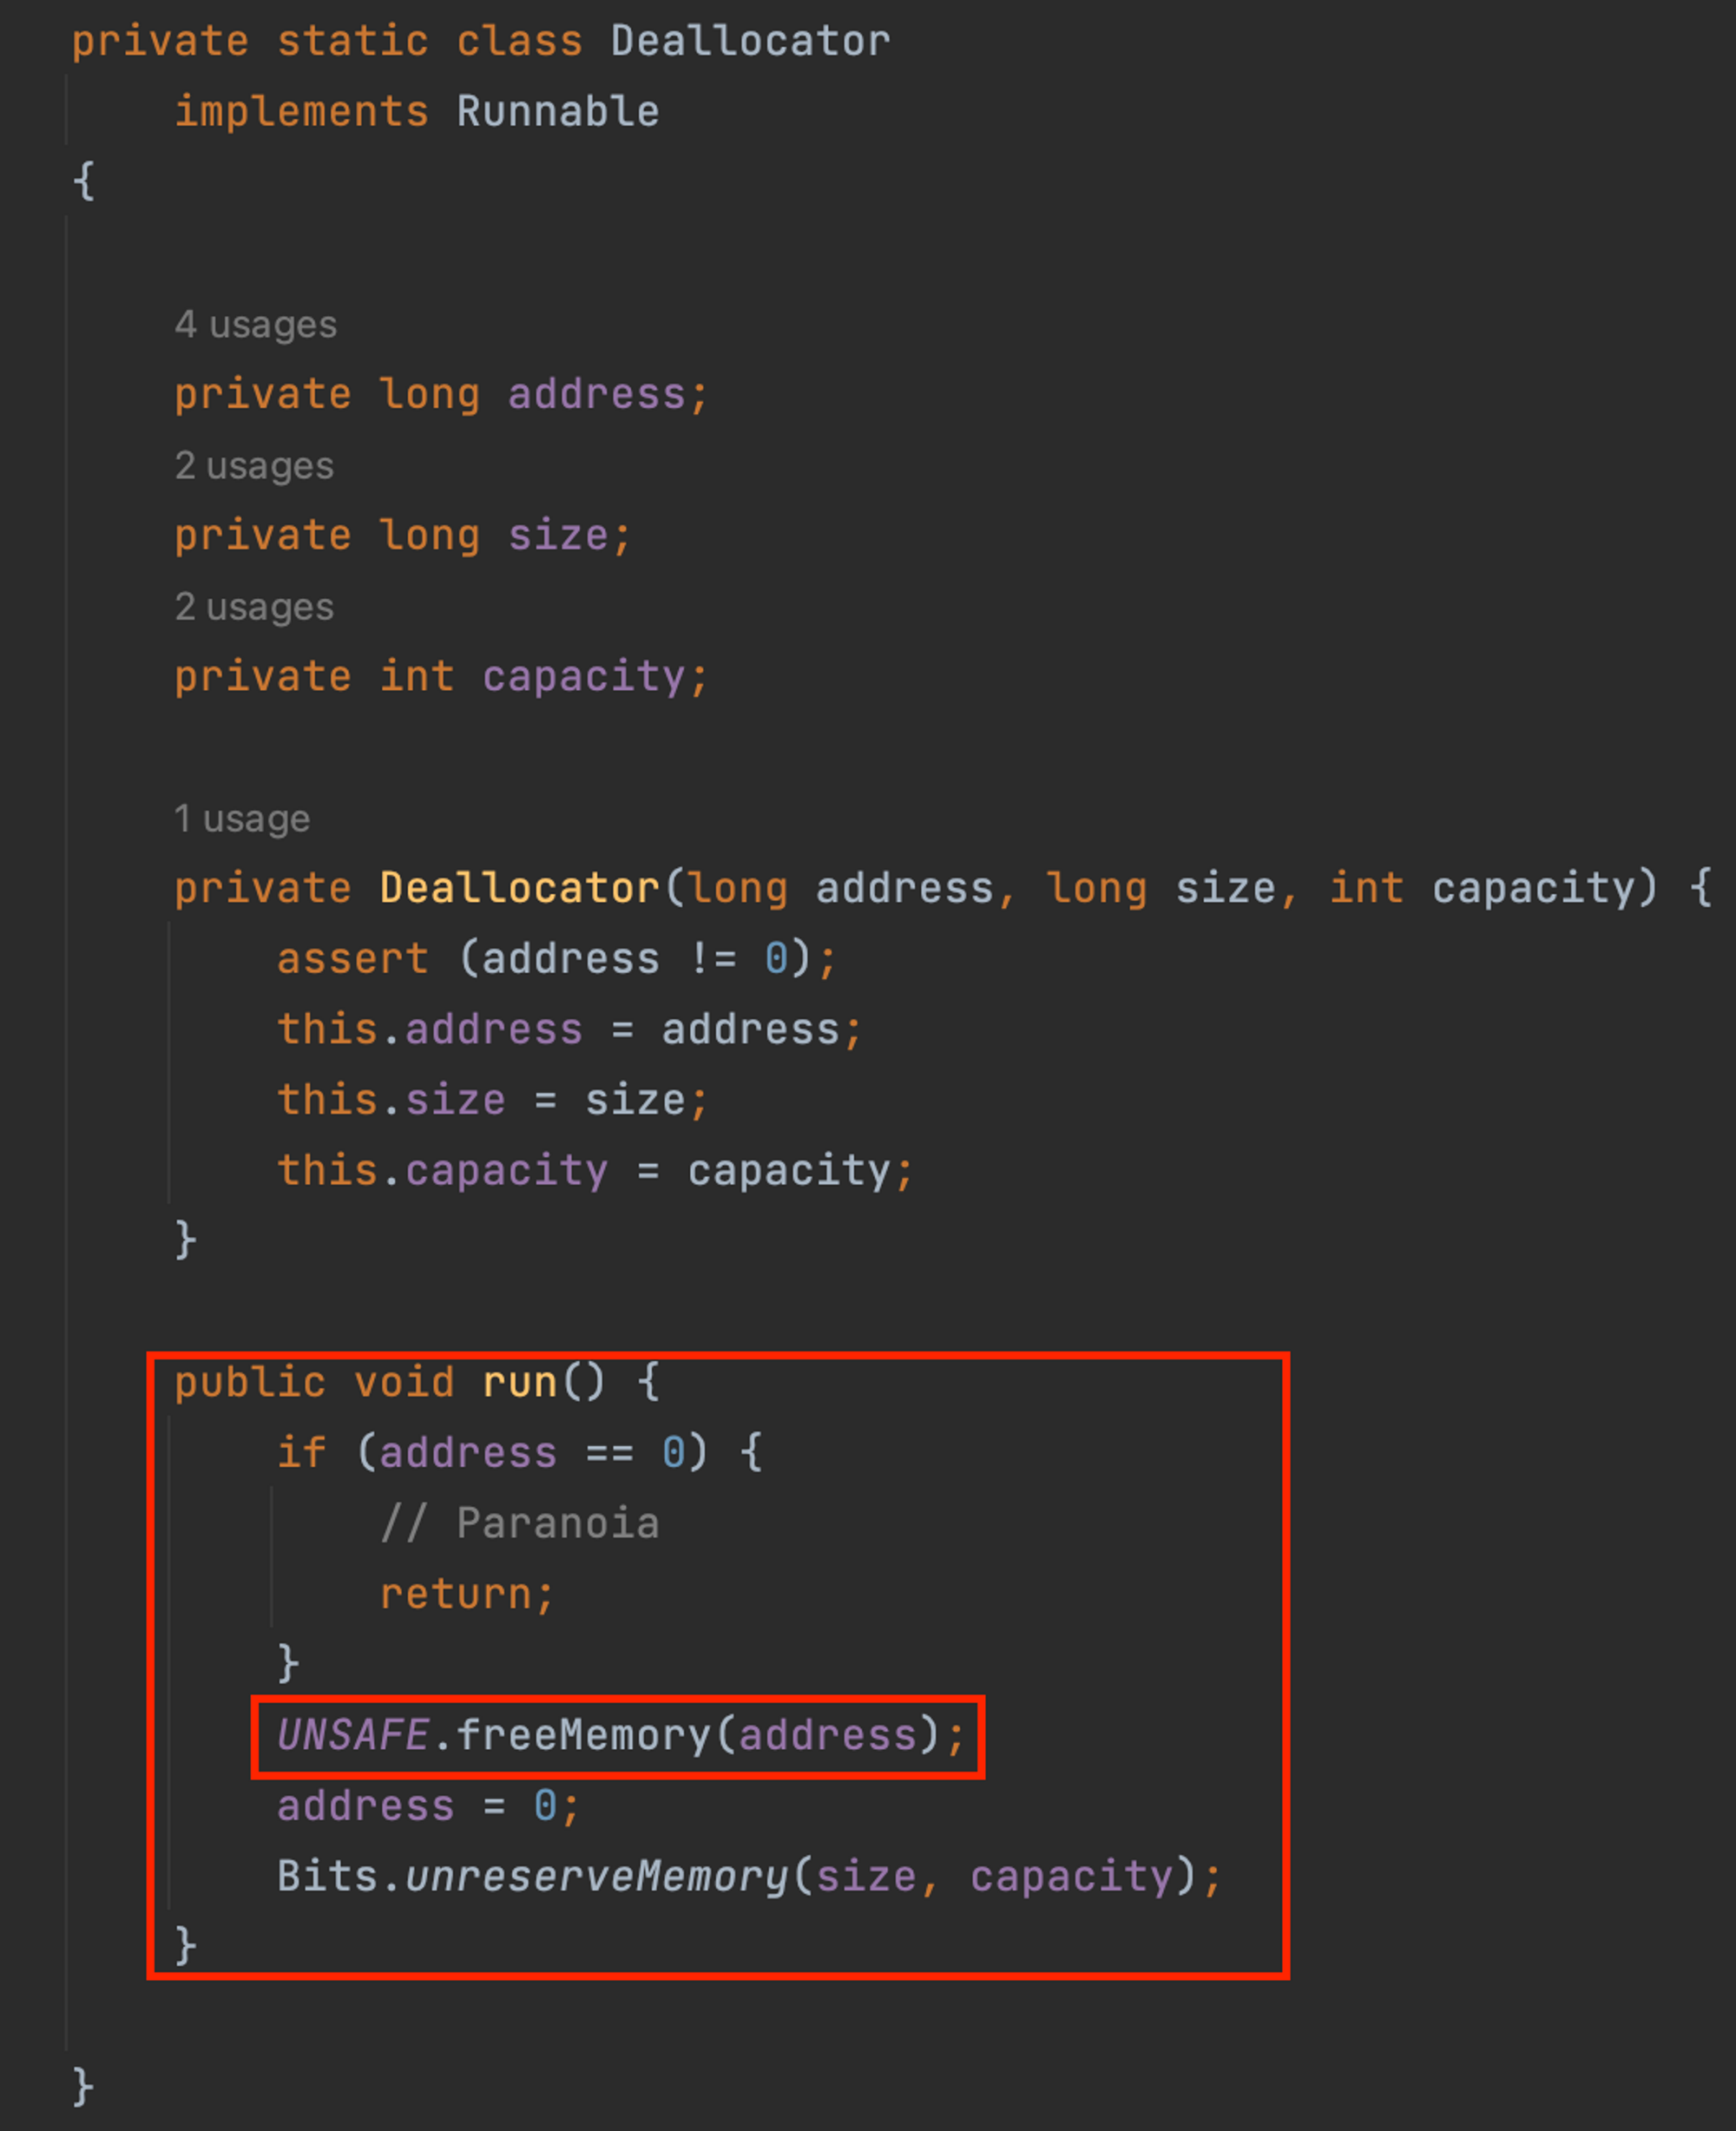
DirectByteBuffer 내부 클래스이며 run method에서 kernel memory를 정리해주며 해당 method는 아래에 설명할 Cleaner method에서 호출해준다.
Cleaner
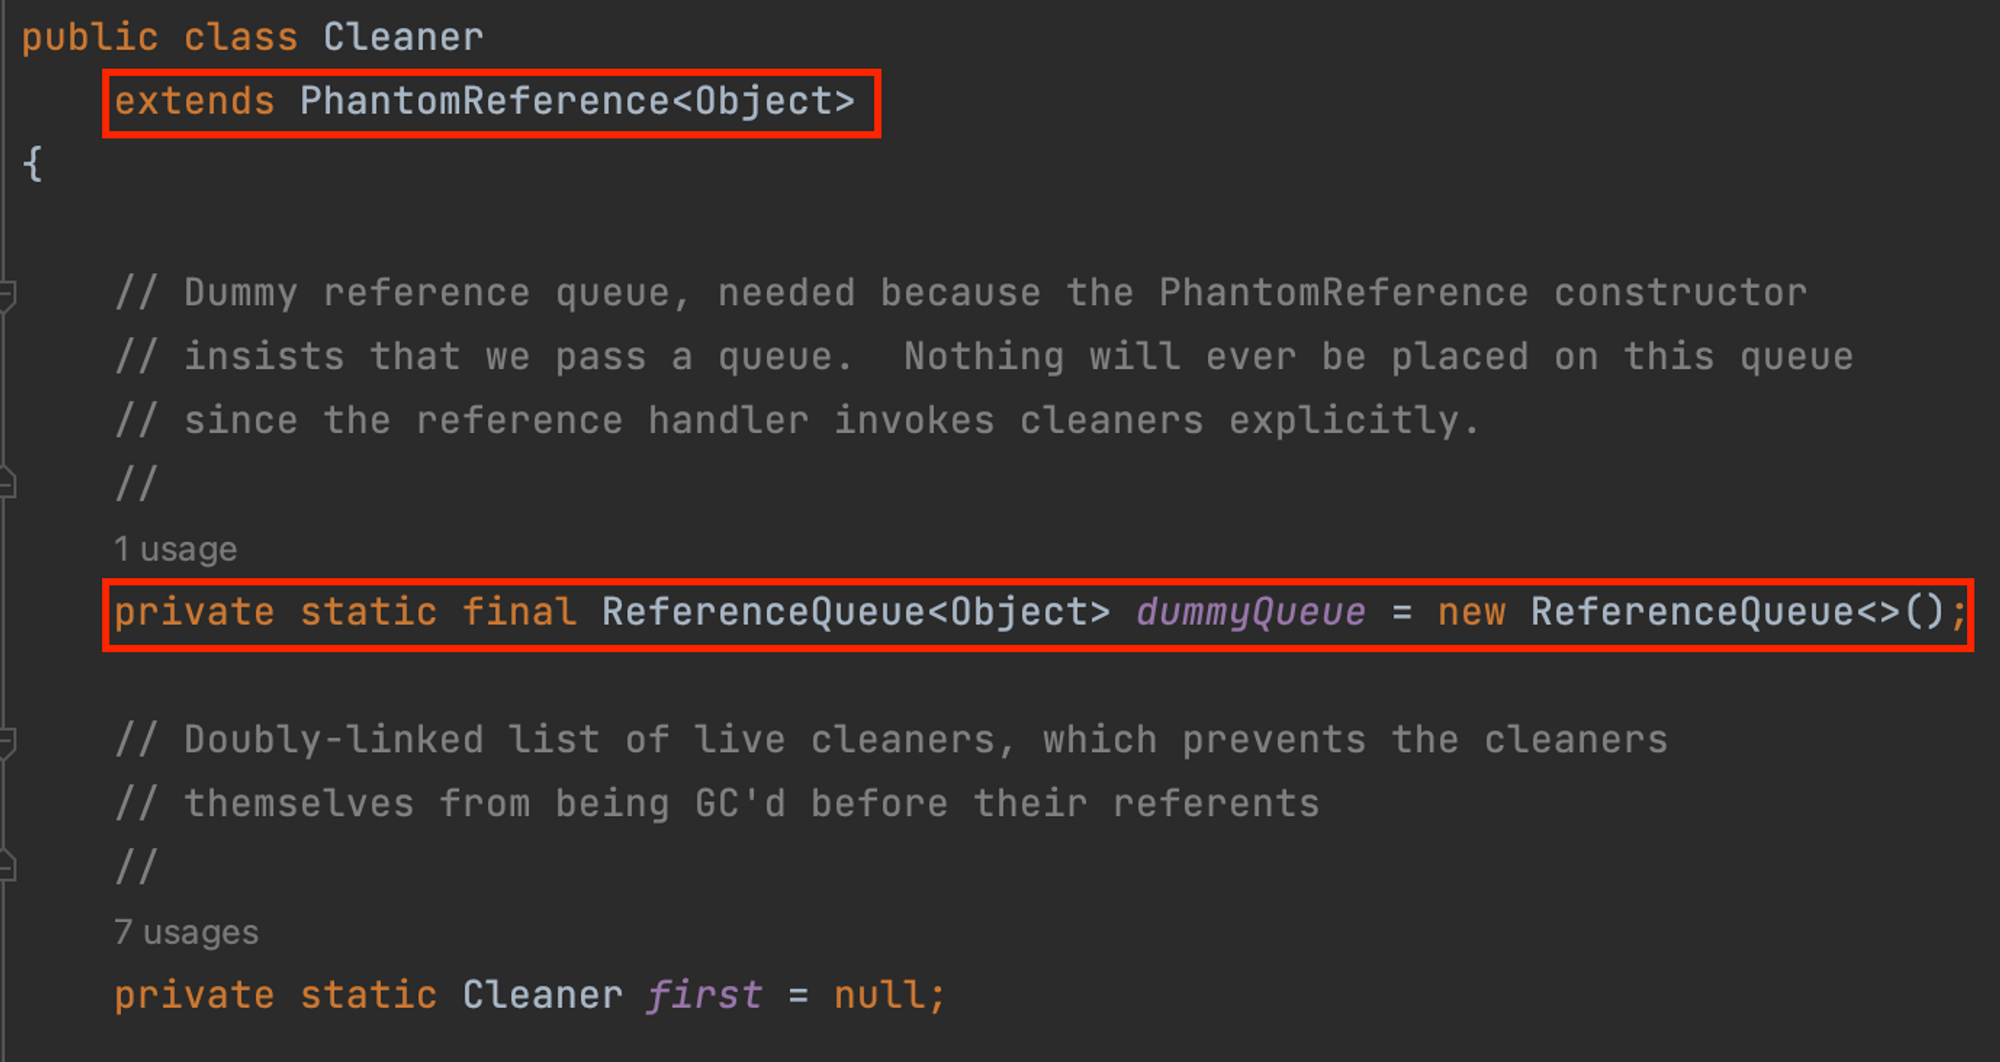
Cleaner는 PhantomReference<Object> 상속하며 ReferenceQueue를 이용하여 clean method를 호출한다. 이 부분이 direct buffer를 memory에서 정리해주는 key point이므로 기억해두자. 이후에 PhantomReference와 ReferenceQueue에 대해 살펴 볼 때 해당 부분이 왜 key point인지 이해할 수 있을 것이다.

DirectByteBuffer 생성자에서 member 변수로 갖고 있는 Cleaner를 초기화하는 부분을 다시 살펴보면 create method를 통해 초기화해주고 있다는 것을 확인할 수 있다.
DirectByteBuffer(int cap) {
    ...
    long base = 0;
    try {
        base = UNSAFE.allocateMemory(size);
    } catch (OutOfMemoryError x) {
        Bits.unreserveMemory(size, cap);
        throw x;
    }
    UNSAFE.setMemory(base, size, (byte) 0);
    ...
    cleaner = Cleaner.create(this, new Deallocator(base, size, cap)); // cleaner를 초기화
    att = null;
}
Clean의 thunk member 변수는 DirectByteBuffer의 내부 클래스인 Deallocator로 초기화되며 clean method가 호출되면 Deallocator의 run method를 호출하게 된다. Deallocator의 run method에서는 Unsafe.freeMemory(int) 를 통해 kernel buffer를 정리해주는 것을 확인할 수 있다. 그럼 Cleaner 클래스의 clean method는 언제, 어떻게 호출될까? 이 부분만 명확해진다면 ByteBuffer.allocateDirect(int) 를 통해 생성한 kernel buffer가 언제 , 어떻게 정리되는지 확인된다.
Cleaner는 PhantomReference<Object> 상속하며 ReferenceQueue를 이용하여 clean method를 호출한다.
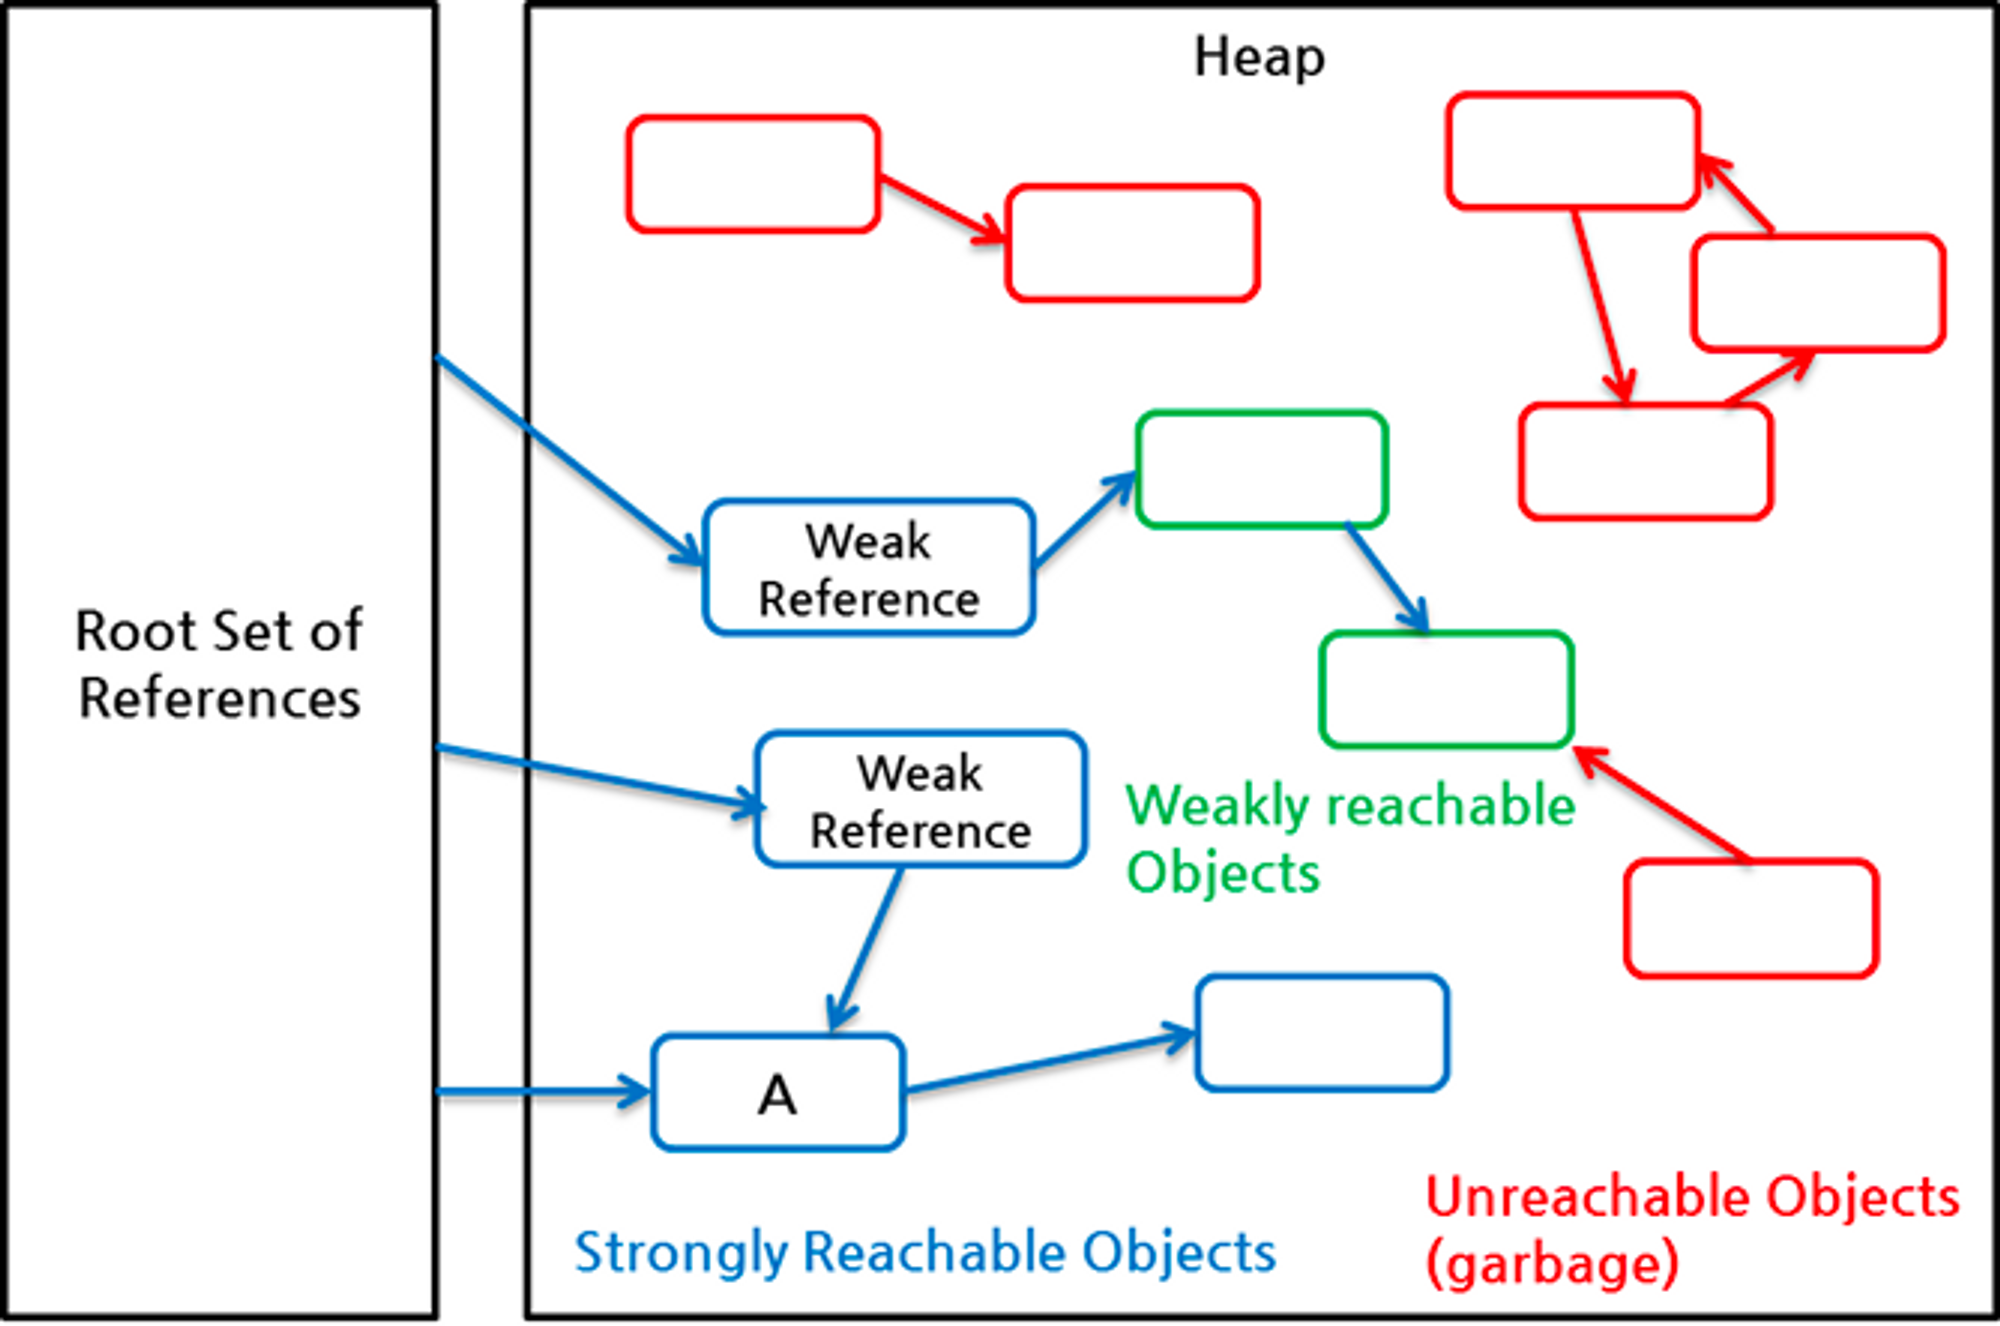
위에서 코드를 살펴볼 때 잠깐 언급한 위의 내용을 떠올려보자. 이게 어떤 의미를 갖고 있는지 설명해보려고한다. java는 개발자가 gc에 직접적으로 관여할 수 없다. 하지만 언어에서 제공하는 Reference mechanism을 이용하면 간접적으로 gc에 관여할 수 있게된다. Java GC는 객체가 gc 대상인지 판별하기 위해서 reachability라는 개념을 사용한다. 어떤 객체에 유효한 참조가 있으면 'reachable'로, 없으면 'unreachable'로 구별하고, unreachable 객체를 gc 대상으로 인식한다. 한 객체는 여러 다른 객체를 참조하고, 참조된 다른 객체들도 마찬가지로 또 다른 객체들을 참조할 수 있으므로 객체들은 참조 사슬을 이룬다. 이런 상황에서 유효한 참조 여부를 파악하려면 항상 유효한 최초의 참조가 있어야 하는데 이를 객체 참조의 root set이라고 한다.
class ReferenceExample {

    private Object dummpy = new Object();

    public void makeGcTargetForDummpy() {
        this.dummpy = null;
    }
}
위의 간단한 코드는 dummy 객체를 gc대상으로 만들기 위해 null로 세팅하는 코드다. null로 세팅함으로써 dummy 변수에 할당된 Object 객체를 더 이상 참조되지 않도록 하는 것이다.

앞에서 설명한 것처럼, 원래 GC 대상 여부는 reachable인가 unreachable인가로만 구분하였고 이를 사용자 코드에서는 관여할 수 없었다. 그러나 java.lang.ref 패키지를 이용하여 reachable 객체들을 strongly reachable, softly reachable, weakly reachable, phantomly reachable로 더 자세히 구별하여 GC 때의 동작을 다르게 지정할 수 있게 되었다. 다시 말해, GC 대상 여부를 판별하는 부분에 사용자 코드가 개입할 수 있게 되었다.
자세한 내용은 첨부한 글을 살펴보면 좋을 것 같다.
- Java Reference와 GC: https://d2.naver.com/helloworld/329631
우리는 위의 네 가지 reachable 중에서 phantomly reachable에 대해 이해해야한다. phantomly reachable을 살펴보기 전에 먼저 ReferenceQueue에 대해 살펴보자.
ReferenceQueue
SoftReference 객체나 WeakReference 객체가 참조하는 객체가 GC 대상이 되면 SoftReference 객체, WeakReference 객체 내의 참조는 null로 설정되고 SoftReference 객체, WeakReference 객체 자체는 ReferenceQueue에 enqueue된다. ReferenceQueue에 enqueue하는 작업은 GC에 의해 자동으로 수행된다. ReferenceQueue의 poll() 메서드나 remove() 메서드를 이용해 ReferenceQueue에 이들 reference object가 enqueue되었는지 확인하면 softly reachable 객체나 weakly reachable 객체가 GC되었는지를 파악할 수 있고, 이에 따라 관련된 리소스나 객체에 대한 후처리 작업을 할 수 있다. 어떤 객체가 더 이상 필요 없게 되었을 때 관련된 후처리를 해야 하는 애플리케이션에서 이 ReferenceQueue를 유용하게 사용할 수 있다. Java Collections 클래스 중에서 간단한 캐시를 구현하는 용도로 자주 사용되는 WeakHashMap 클래스는 이 ReferenceQueue와 WeakReference를 사용하여 구현되어 있다.
SoftReference와 WeakReference는 ReferenceQueue를 사용할 수도 있고 사용하지 않을 수도 있다. 이는 이들 클래스의 생성자 중에서 ReferenceQueue를 인자로 받는 생성자를 사용하느냐 아니냐로 결정한다. 그러나 PhantomReference는 반드시 ReferenceQueue를 사용해야만 한다. PhantomReference의 생성자는 단 하나이며 항상 ReferenceQueue를 인자로 받는다.
public PhantomReference(T referent, ReferenceQueue<? super T> q) {
    super(referent, q);
}
Phantomly Reachable과 PhantomReference
GC 대상 객체를 찾는 작업과 GC 대상 객체를 처리하는 작업이 연속적이지 않 듯이, GC 대상 객체를 처리하는 작업과 할당된 메모리를 회수하는 작업도 연속된 작업이 아니다. GC 대상 객체를 처리하는 작업, 즉 객체의 파이널라이즈 작업이 이루어진 후에 GC 알고리즘에 따라 할당된 메모리를 회수한다.
GC 대상 여부를 결정하는 부분에 관여하는 softly reachable, weakly reachable과는 달리, phantomly reachable은 파이널라이즈와 메모리 회수 사이에 관여한다. strongly reachable, softly reachable, weakly reachable에 해당하지 않고 PhantomReference로만 참조되는 객체는 먼저 파이널라이즈된 이후에 phantomly reachable로 간주된다. 다시 말해, 객체에 대한 참조가 PhantomReference만 남게 되면 해당 객체는 바로 파이널라이즈된다. GC가 객체를 처리하는 순서는 항상 다음과 같다.
- soft references
- weak references
- 파이널라이즈
- phantom references
- 메모리 회수
즉, 어떤 객체에 대해 GC 여부를 판별하는 작업은 이 객체의 reachability를 strongly, softly, weakly 순서로 먼저 판별하고, 모두 아니면 phantomly reachable 여부를 판별하기 전에 파이널라이즈를 진행한다. 그리고 대상 객체를 참조하는 PhantomReference가 있다면 phantomly reachable로 간주하여 PhantomReference를 ReferenceQueue에 넣고 파이널라이즈 이후 작업을 애플리케이션이 수행하게 하고 메모리 회수는 지연시킨다.
앞서 설명한 것처럼 PhatomReference는 항상 ReferenceQueue를 필요로 한다. 그리고 PhantomReference의 get() 메서드는 SoftReference, WeakReference와 달리 항상 null을 반환한다. 따라서 한 번 phantomly reachable로 판명된 객체는 더 이상 사용될 수 없게 된다. 그리고 phantomly reachable로 판명된 객체에 대한 참조를 GC가 자동으로 null로 설정하지 않으므로, 후처리 작업 후에 사용자 코드에서 명시적으로 clear() 메서드를 실행하여 null로 설정해야 메모리 회수가 진행된다.
이와 같이, PhantomReference를 사용하면 어떤 객체가 파이널라이즈된 이후에 할당된 메모리가 회수되는 시점에 사용자 코드가 관여할 수 있게 된다.
Phantom Reference example
- https://www.baeldung.com/java-phantom-reference
- https://luckydavekim.github.io/development/back-end/java/phantom-reference-in-java
Release Kernel Memory Allocated By DirectByteBuffer
Phantom Reference에 대해 살펴보았으니 다시 본래의 목적인 DirectByteBuffer에서 할당한 kernel memory를 언제 release해주는지 살펴보자.
DirectByteBuffer의 생성자를 다시 살펴보면 cleaner 변수를 초기화할 때 Deallocator를 생성하여 Cleaner의 thunk 변수로 초기화한다. Deallocator와 Cleaner 코드를 다시 살펴보자.
코드에 주석을 달아두었다. 해당 주석을 통해 clean method가 언제 호출되는지 이해할 수 있다.
Deallocator
private static class Deallocator implements Runnable {

    private long address;
    private long size;
    private int capacity;

    private Deallocator(long address, long size, int capacity) {
        assert (address != 0);
        this.address = address;
        this.size = size;
        this.capacity = capacity;
    }

    // Cleaner의 clean method에서 thunk.run()을 통해 호출된다.
    public void run() {
        if (address == 0) {
            return;
        }
        UNSAFE.freeMemory(address);
        address = 0;
        Bits.unreserveMemory(size, capacity);
    }
}
Cleaner
public class Cleaner extends PhantomReference<Object> {

    private static final ReferenceQueue<Object> dummyQueue = new ReferenceQueue<>();

    ...

    private final Runnable thunk;

    private Cleaner(Object referent, Runnable thunk) {
        super(referent, dummyQueue);
        this.thunk = thunk;
    }

    // DirectByteBuffer 생성자에서 Cleaner.create(this, new Deallocator(base, size, cap))을 호출한다.
    // 즉, PhantomReference의 referent로 들어가는 객체는 DirectByteBuffer이다.
    // DirectByteBuffer 객체가 PhantomReference로만 참조되는 순간에 ReferenceQueue에 PhantomRefernce 객체가 enqueue된다.
    // 이때, PhantomRefernce 객체는 Cleaner이며 ReferenceQueue에서 poll하여 후처리를 실행하는 daemon thread에서 clean method를 호출하는 것이다.
    public static Cleaner create(Object ob, Runnable thunk) {
        if (thunk == null)
            return null;
        return add(new Cleaner(ob, thunk));
    }

    /**
     * Runs this cleaner, if it has not been run before.
     */
    public void clean() {
        if (!remove(this))
            return;
        try {
            // thunk는 Deallocator의 객체이므로 thunk.run 호출시 Deallocator의 run method가 호출된다.
            // Deallocator의 run method에서는 native method인 UNSAFE.freeMemory(long)을 호출하여 kernel buffer를 release한다.
            thunk.run();
        } catch (final Throwable x) {
            AccessController.doPrivileged(new PrivilegedAction<>() {
                    public Void run() {
                        if (System.err != null)
                            new Error("Cleaner terminated abnormally", x)
                                .printStackTrace();
                        System.exit(1);
                        return null;
                    }});
        }
    }
}
DirectByteBuffer의 생성자 & Deallocator & Cleaner 코드와 주석을 보면 다음과 같은 경우에 kernel buffer가 release 된다는 것을 이해할 수 있다.
@Test
void directByteBufferGcTest() throws InterruptedException {
    ByteBuffer buffer = ByteBuffer.allocateDirect(1024);

    // PhantomReference(Cleaner)로만 참조된다.
    buffer = null;

    // PhantomReference 객체가 참조하는 객체가 GC 대상이 되면 PhantomReference 객체 자체는 ReferenceQueue에 enqueue된다.
    // PhantomReference 객체는 Cleaner이며 ReferenceQueue에서 poll하여 후처리를 실행하는 daemon thread에서 clean method를 호출하게된다.
    // DirectByteBuffer객체가 gc됨과 동시에 UNSAFE.freeMemory(long)가 호출되어 kernel buffer도 정리하게된다.
    System.gc();
    ...
}
Reference Count를 통한 ByteBuf 관리
Netty의 Reference Count를 통해 ByteBuf가 관리되는 방법은 지금까지 설명한 내용들을 모두 이해하였다면 어려울 것이 없다. netty의 ChannelHandler에서 관리해주는 PooledByteBuf를 확인해보자.
abstract class PooledByteBuf<T> extends AbstractReferenceCountedByteBuf {

    private final Handle<PooledByteBuf<T>> recyclerHandle;

    protected PoolChunk<T> chunk;
    protected long handle;
    // ByteBuffer가 저장된다.
    protected T memory;
    protected int offset;
    protected int length;

    ...

    @Override
    protected final void deallocate() {
        if (handle >= 0) {
            final long handle = this.handle;
            this.handle = -1;
            memory = null;
            chunk.decrementPinnedMemory(maxLength);
            chunk.arena.free(chunk, tmpNioBuf, handle, maxLength, cache);
            tmpNioBuf = null;
            chunk = null;
            cache = null;
            recycle();
        }
    }
}
ByteBuf의 deallocate() method를 살펴보면 memory = null 를 통해 ByteBuffer의 참조를 제거한다. 그리고 deallocate는 PooledByteBuf 클래스의 부모 클래스인 AbstractReferenceCountedByteBuf에서 release() method를 호출 했을 때 특정 조건을 만족하면 호출된다. 여기서 특정 조건이라 함은 reference count가 0이 되었을 경우이다.
public abstract class AbstractReferenceCountedByteBuf extends AbstractByteBuf {
    ...

    @Override
    public boolean release() {
        return handleRelease(updater.release(this));
    }

    @Override
    public boolean release(int decrement) {
        return handleRelease(updater.release(this, decrement));
    }

    private boolean handleRelease(boolean result) {
        if (result) {
            deallocate();
        }
        return result;
    }

    /**
     * Called once {@link #refCnt()} is equals 0.
     */
    protected abstract void deallocate(); // PooledByteBuf에서 구현하고 있다.
}
ByteBuf를 사용 후 release 해주지 않으면 refCnt는 0이 되지 않을 것이고 deallocate()는 호출되지 않을 것이다. 그렇게되면 PooledByteBuf는 사용중인 객체로 인식될 것 이고 object leak이 발생하게된다. -Dio.netty.leakDetection.level=ADVANCED 를 활성화하여 Leak 로그를 확인할 수 있다.
다음은 PooledByteBuf를 테스트한 코드이다.
@Test
void pooledByteBufTest() {
    // Setting pool size 1
    PooledByteBufAllocator allocator = new PooledByteBufAllocator(true, 1, 1, 4096, 0, 0, 0, true);

    // Allocate a ByteBuf instance
    ByteBuf buf1 = allocator.directBuffer(4096);
    Assertions.assertNotNull(buf1);

    // Release buf1 to make the memory available for allocation again
    buf1.release();

    // Attempt to allocate another ByteBuf instance
    ByteBuf buf2 = allocator.directBuffer(4096);
    // buf1.release()하였므로 buf1을 재사용한다.
    Assertions.assertSame(buf1, buf2);

    // buf2.release()를 하지않았으므로 새로운 ByteBuf를 생성한다.
    ByteBuf buf3 = allocator.directBuffer(4096);
    Assertions.assertNotNull(buf3);
    Assertions.assertNotSame(buf1, buf3);

    ByteBuf buf4 = allocator.directBuffer(4096);
    ByteBuf buf5 = allocator.directBuffer(4096);
    ByteBuf buf6 = allocator.directBuffer(4096);
    // buf4.release();
    // buf5.release();
    // buf6.release();
    buf4 = null;
    buf5 = null;
    buf6 = null;
    while (true) {
        System.gc();
        Thread.sleep(500);
    }
}
테스트 코드 작성 후 Deallocator의 run method가 실행되는지 여부를 체크하기 위해 해당 line이 실행되면 String.format("Deallocator run invoked: %d", address) 를 출력하도록 하였다.
case1. release를 호출하지 않았을 때

case2. release를 호출했을 때

PS:
- Leak로그는 ByteBufAllocator를 통해서 ByteBuf를 생성해야 tracking되며, new UnpooledDirectByteBuf(new UnpooledByteBufAllocator(true), 1024, 1024); 이렇게 직접 생성하면 Leak로그가 출력되지 않는다. toLeakAwareBuffer(buf); method는 ByteBufAllocator에서 호출해주고 있기 때문이다.
- 다음과 같은 코드는 leak 로그가 찍히지만 실제로는 Deallocator.run method 가 호출된다. 참조값이 null이 되어 gc대상이 되기 때문이다.
@Test
void byteBufMemoryLeakTest() throws InterruptedException {
    ResourceLeakDetector.setLevel(ResourceLeakDetector.Level.PARANOID);
    for (int i = 0; i < 2000; i++) {
        ByteBuf buffer = Unpooled.directBuffer();
        buffer = null;

        System.gc();
    }

    while (true) {

    }
}
+ 하지만 다음과 같은 코드는 참조 값이 null이 아니므로 memory leak이 발생할 수 있다. Connection을 사용 후 Connection Pool로 돌려주지 않으면 발생하는 문제와 동일하다.
@Test
void byteBufMemoryLeakTest() throws InterruptedException {
    ResourceLeakDetector.setLevel(ResourceLeakDetector.Level.PARANOID);

    List<ByteBuf> bufferList = new ArrayList<>();
    for (int i = 0; i < 2000; i++) {
        bufferList.add(Unpooled.directBuffer(1999));
    }

    for (int i = 0; i < 2000; i++) {
        ByteBuf buffer = bufferList.get(i);
        buffer.writeBytes("hello bytebuf".getBytes(StandardCharsets.UTF_8));

        System.gc();
    }

    while (true) {

    }
}'Framework > Netty' 카테고리의 다른 글
| Netty의 스레드 모델 (4) | 2020.06.14 |
|---|---|
| Netty의 기본 Component 및 Architecture (0) | 2020.05.17 |

